Log in

Archive for the 'Computer' Category

VirtualBox – Move Virtual Machines (VM) and Virtual Disks (VDI)

Posted by on Oct 19 2015 | Computer, VirtualBox

When you use an guest operating system in VirtualBox, you create two kinds of assets: virtual machines (VM) and virtual disks (VDI).  Virtual Machines, typically with the file extension *.vbox, contain information about CPUs, memory, network & sound cards, etc, while virtual disks contain the actual guest operating system.

You can store and move VMs independently of VDIs — you can store all your VMs in one directory and all your VDIs in another, and then you can change your mind and start moving things around.  And this “moving things around” is where the trouble starts.

VirtualBox creates a unique identifying number (UUID) for every a VM or VDI it creates, and it remembers where that asset is located.  If you move a VM or VDI with Finder or Explorer, VirtualBox gets confused and will give you a UUID error when you try to use the VM or VDI in its new location.

There are several ways to move a VirtualBox VM and/or VDI.  Many descriptions require that you edit the XML files where the UUIDs are stored to avoid getting a UUID error.  There a much easier way.

The drive that my VDI is on is getting crowded, and I want to move the VirtualDisk to a different drive.  And while I am at it, I want the Virtual Machine (VM) that uses that virtual disk (VDI) to be in the same location as the VDI.

I am using VirtualBox 4.1.20 on a Mac Host.

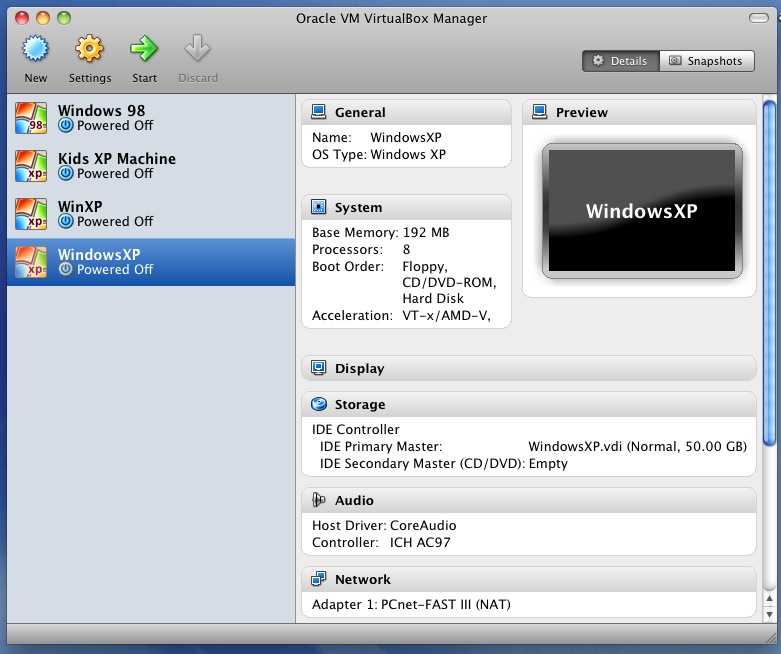
To move a Virtual Machine, you start by opening the VirtualBox Manager.  This GUI handles the information about each VM.  It does not manage the virtual disks, only the virtual machines that use the disks.  To manage the disks, you use the Virtual Media Manager.  We will get to that later.

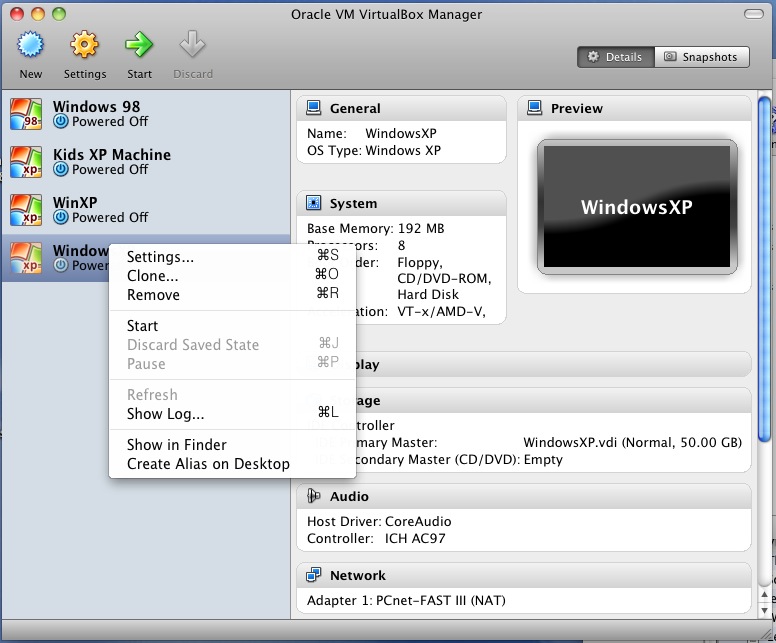
I want to move the VM called WindowsXP (selected in blue in the following image).

VB 01

The first thing I am going to do is Right-Click the VM I want to move and select “Show in Finder” from the menu (see image below)

VB 01a

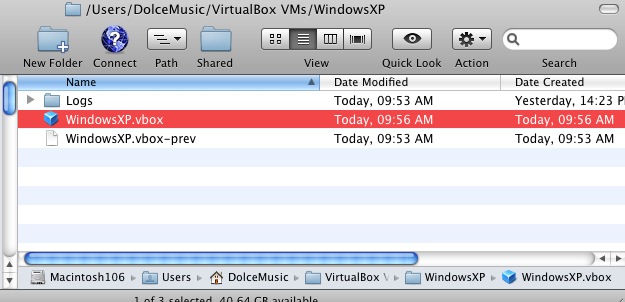
You will now have an open window showing you the folder that contains a file called “(virtual machine name).box”  In my case, because that name of the VM is “WindowsXP,” my directory looks like this:

VB 01b

I recently had the experience of being unable to find the VM I wanted to move, because I had forgotten this step and my naming strategy was poorly planned.  I had several old VMs with the same name that I had long ago removed from VirtualBox but failed to delete.

Now that you know where your VM is, you can remove it from VirtualBox’s records.  You will only remove VirtualBox’s knowledge of the VM, you will not remove the VM itself.

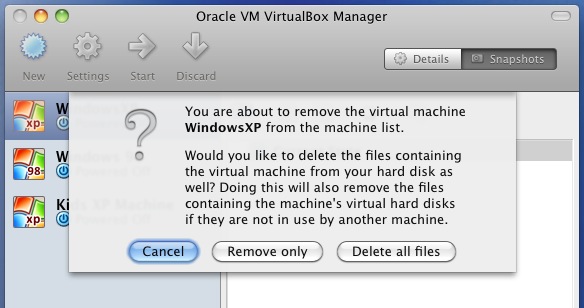
Again, Right-Click the VM you want to move.  Now select the menu item “Remove,” and you will next see the following message:

VB 02

Clicking “Remove only” will delete information about the Virtual Machine (VM) from VirtualBox Manager, but it will not delete the machine itself.  Clicking “Delete all files” WILL delete the entire VM folder from your host computer.

I want to move my VM, so I will click “Remove only.”

Now go back to the directory that contains your VM folder.  My VM is “WindowsXP.vbox” and it is stored in the directory /Users/DolceMusic/VirtualBox/WindowsXP.  So I go to /Users/DolceMusic/VirtualBox and drag the folder “WindowsXP” to its new location.  Because VirtualBox no longer has any knowledge of this VM, you will not get a UUID error.

Now that your VM is in its new location, you need to let VirtualBox Manager know about it.

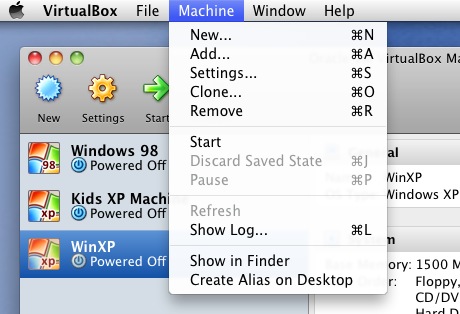
Go to the menu called “Machine” and select the item “Add…”  (see image below).

VB 04

Select the machine you want to add, and click the “Open” button (or press Return).  You VM is now ready to go in its new location.

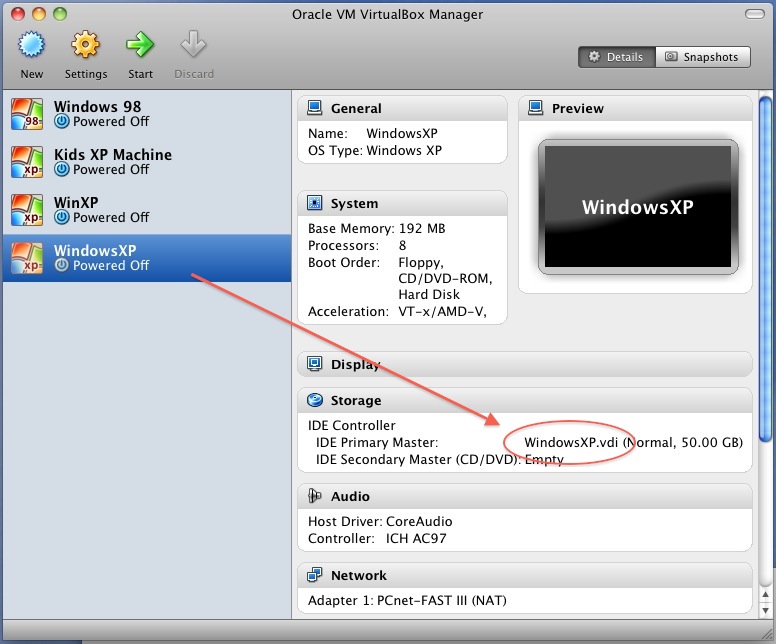
The VDI that contains the guest operating system, however, is still in its original location.  To move that, you will go through steps analogous to what you did to move the VM — you will remove the record of your VDI from VirtualBox, move the VDI file, and then add the VDI back to VirtualBox from its now location.  Before you move the VDI, you want to be certain which VDI you need to move.  When you select a virtual machine in VirtualBox Manager, you will see a lot of information about that VM, including the drives that it uses.

VB 06

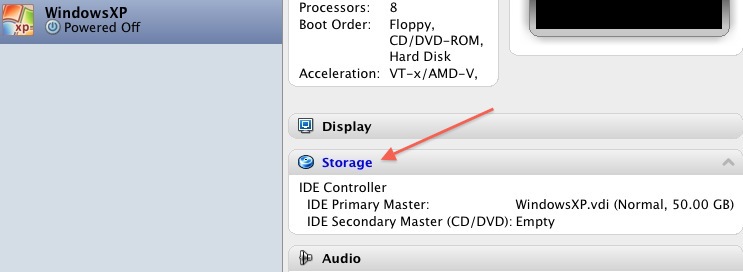
Click the label that says “Storage,”

VB 07

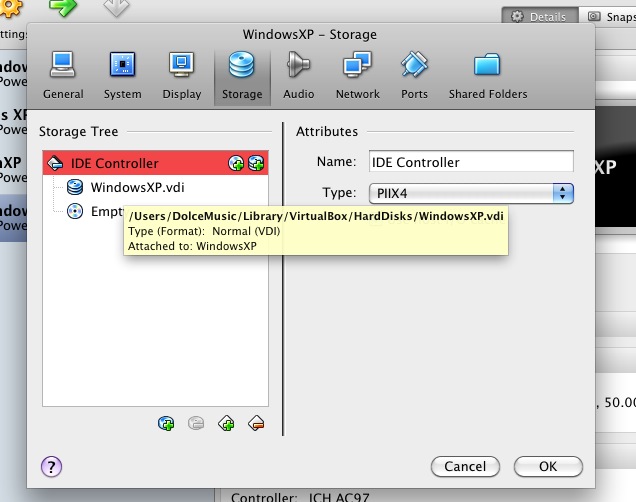
and you will be taken to the following screen.  Hold your mouse over the name of the VDI, and an info popup will tell you the path to that VDI.

VB 08

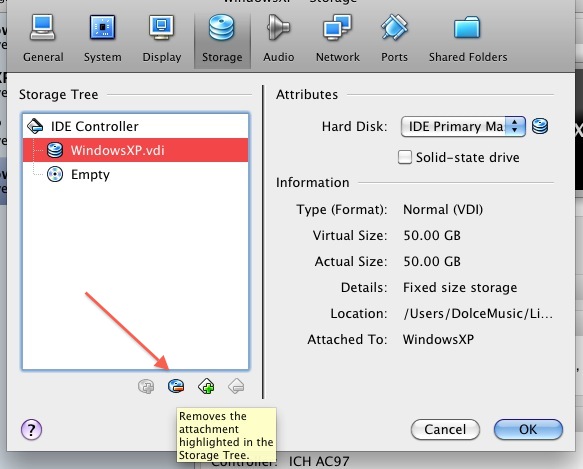
Now you need to detach the VDI from any virtual machines that use it.  Select the VDI under the IDE Controller tree and click the button with the minus sign, and then click OK.

VB 09

You have now told the VMs to forget all about the VDI, now you have to tell VirtualBox itself to forget about it.

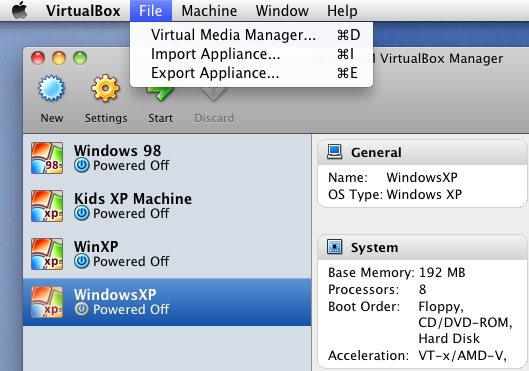
Go the the File menu and select “Virtual Media Manager.”

VB 05

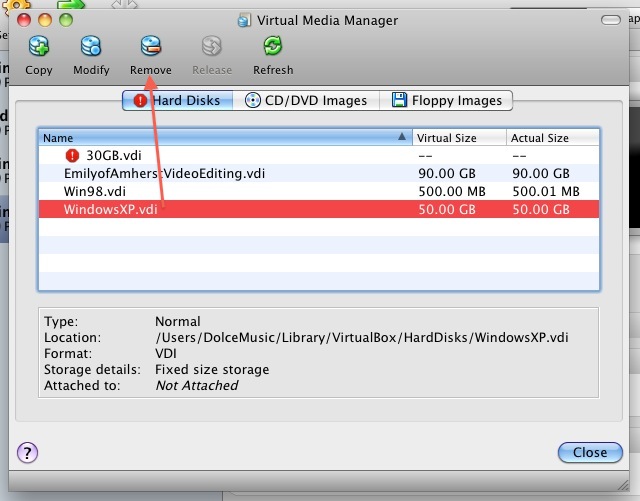
Select the drive you want to remove, and click the “Remove” button.

VB 10

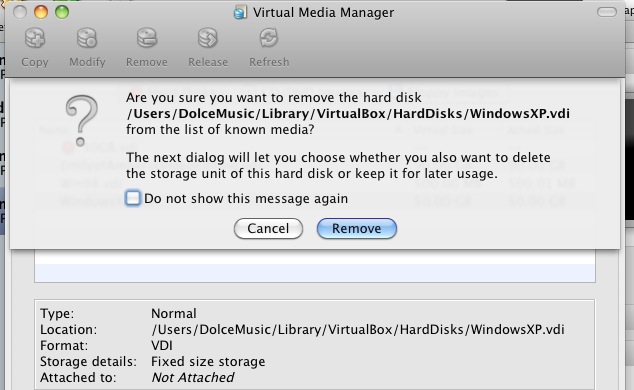
You will see the following message:

VB 11

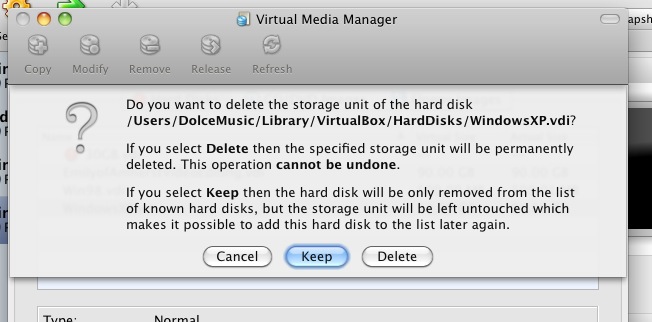
Select “Remove” and you will see this message:

VB 12

I want to move the VDI, so I select “Keep.”  The VDI is now a non-entity as far as VirtualBox is concerned, so you can move/rename to your heart’s content.  I want my VDI in the same directory as the VM that uses it, so I move it there.

After the VDI has completed its move, you need to tell VirtualBox about it again.  Use your file manager to find the VDI file and drag it to the Virtual Media Manager.  That’s it.  Now you must reattach the VDI to the VM that uses it.  Close Virtual Media Manager to return to VirtualBox Manager.  Select that VM that uses the VDI, and click the label that says “Storage” (the same place you went to Remove the VDI  as described a few lines above).

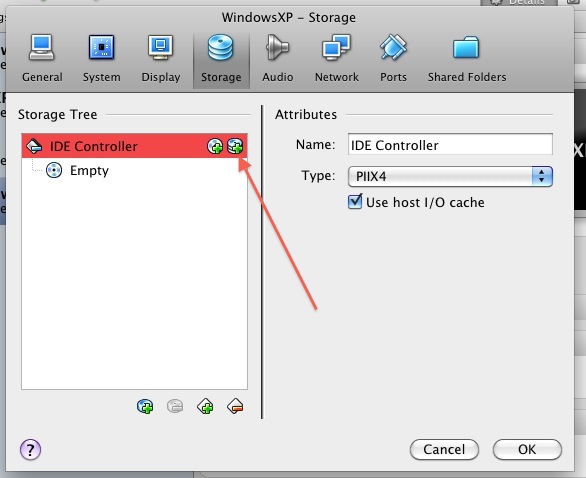
Click the button to add a hard drive (image below)

VB 13

You will have the option of creating a new disk or opening an existing one.  Select Open and Existing One, find the VDI you want to add, click OK, and your VM is ready to go.

You have moved your VM and your VDI, there have been no UUID errors, and there was no XML editing necessary. (At least, all this is true for me.  If you have any problems, please let me know.)
Comments Off on VirtualBox – Move Virtual Machines (VM) and Virtual Disks (VDI) for now

Logic Pro Tip – Color Your Regions

Posted by on Mar 20 2014 | Logic Pro

As you begin a project it can be very easy, in your rush of inspiration, to overlook the importance of labeling your regions.  At first it might not seem important; you know everything that is in your arrangement.  The next day or week, however, as your work grows and that handful of regions becomes hundreds, it will become harder and harder to navigate your project without labels that make sense.

You can:

  1. assign labels to regions
  2. assign colors to regions or tracks
  3. assign notes to tracks
  4. assign markers to particular ranges of you project.


Today, I am going to discuss assigning colors.  You can assign colors to tracks or individual regions.  By default, any new region will take the color assigned to the track.

There is no right way to determine what regions get what colors.  I give bass regions dark colors.  I give yellows to the wind instruments — the higher the range, the lighter the color.  I give earth tone reds to the strings.  The colors you assign with depend on your needs and taste.

You might also assign colors based on the purpose of the regions — regions of red go with the fight scene, for instance.


How to define a track’s default color

A track’s color determines the default color of any new region created in that track.

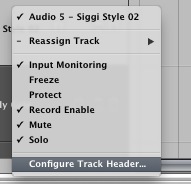
To see the tracks’ default colors, right-click in any Track Header, and the following menu pops up.

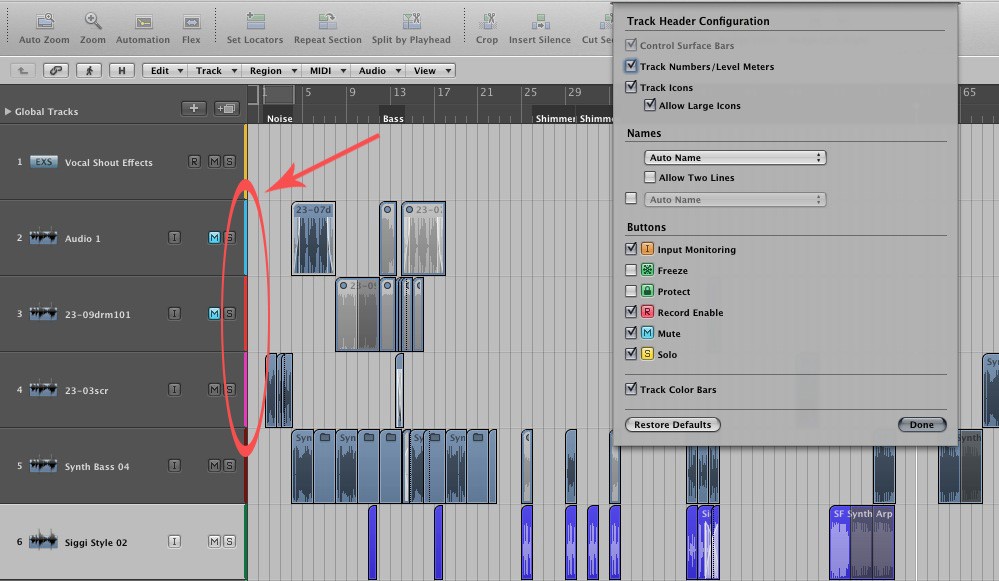
Select “Configure Track Header,” and the following Track Header Configuration options pane appears.  At the bottom of the Track Header Configuration box you will see a check box labelled “Track Color Bars.”  Selecting this box will cause thin color bars to display at the right edge of the Track Header.

The color bars indicated by the red circle and arrow are the tracks’ default colors.


How to Change a Track’s or Region’s Color

Changing a track’s color is easy, but not obvious.

Check the box next to “Track Color Bars” and click “Done.”

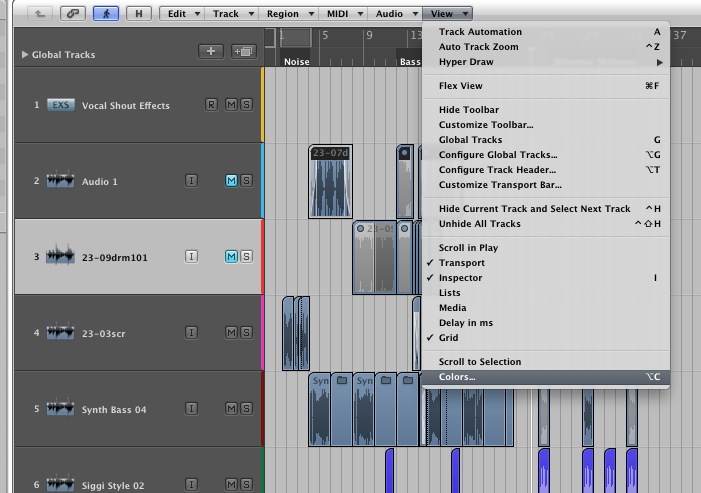
Select “View” from the Arrange Area menu bar.  Down at the very bottom is the menu item “colors.”

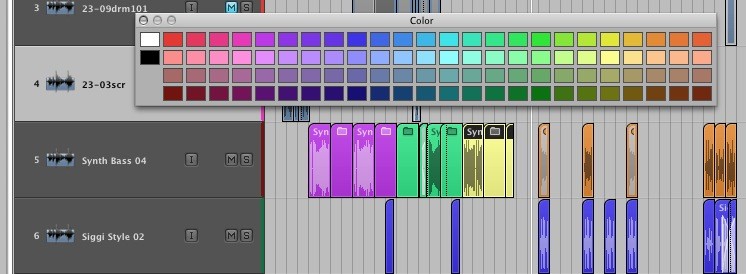
Select “Colors” from the “View” menu, and the color pallet appears.

The color palette is floating; you can put it wherever you want.  When the palette is open, changing the color of a track or region is very simple.

  1. Select the track or region whose color you want to change.
  2. Select the new color you want from the color palette.
You can select multiple regions to give them all the same color simultaneously.

Comments Off on Logic Pro Tip – Color Your Regions for now

Convert Video Files so They Will Play on a Creative Zen

Posted by on Mar 26 2012 | Conversion, Utilities, Video

Congratulations!  You have Creative’s Zen, and if your experience has been anything like mine, you have, by now, discovered that while the player is a nice little machine, the software really stinks and Creative’s support is not much better.  Particularly unpleasant is the challenge of converting videos for use on the Zen.


After much experimenting, I have discovered a free, fairly-straight forward solution for producing a video that will play on a Zen.

Step 1: Get Creative’s Zen
Step 2: Get a video file you want to put on the Zen.
Step 3: Get SUPER from eRightSoft

This is the Wikipedia page about SUPER:
             http://en.wikipedia.org/wiki/SUPER_%C2%A9

This is the link to SUPER’s homepage:
             http://www.erightsoft.com/SUPER.html. 

eRightSoft really buries the download link (it’s at the bottom of the third page), so I have included a direct link to their file here:
             http://www.erightsoft.biz/GetFile.php?SUPERsetup.exe


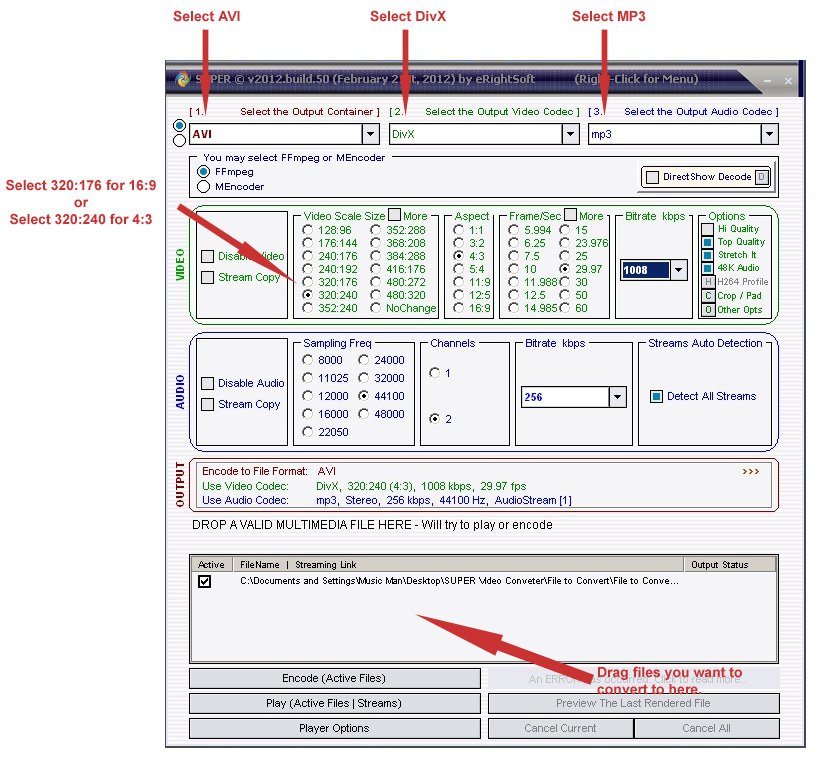
When you open SUPER, you have many options.  The crucial options are pointed out in the following image.  The bitrate of your video and audio is not so crucial, so you can play around with that.


You can right-click anywhere in the SUPER window to get a large menu of options.  One of the options is “Output File Saving Management.”  Use that option to specify where you want your converted files to be saved.  From that same menu you can choose “Export (Save) a SUPER “Settings Profile.””  This will save some of the options you have selected, but it will not save the options you choose on the screen that follows (see below), so I suggest that you write down, and put in a safe place, the exact settings described here.  More than once I have figured out successful settings, used them, then, a few months later, forgotten what I did.  That is why I have written this post.


SUPER 01

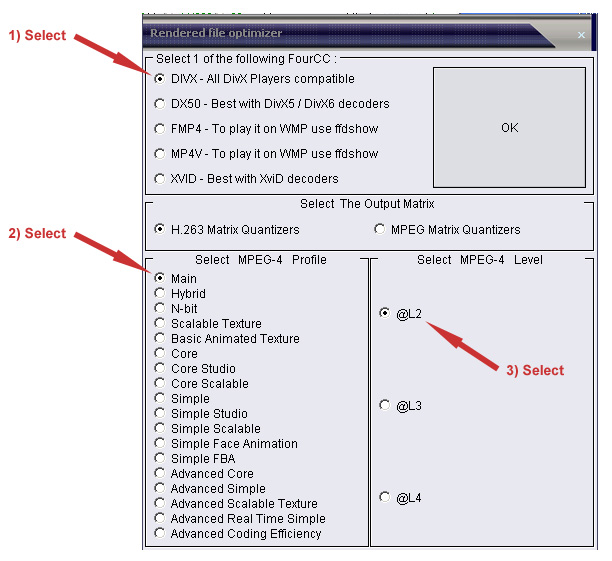
After you have dragged the files you want to convert to SUPER and selected your options, click the button near the bottom left that says “Encode (Active Files).”  Be patient for a few seconds, after which time the following screen will appear.  Select the options indicated by the arrows, then click the big “OK” button.

SUPER Video Concerter 02


After SUPER has finished you SHOULD have files that you can drag to the Video folder on your Zen. 


Two final comments:
1) These settings work for me.  If you have problems, please let me know.  I am by no means an expert in this stuff, but I do like learning more.
2) These are not the only settings that will work.  They might not even be the best (see above about me not being an expert).  If you know of other settings that might produce smaller files or better quality files, please feel free to share.  I was just looking for something that worked, and this is what I found. 


Cheers.

Comments Off on Convert Video Files so They Will Play on a Creative Zen for now

error: Content is protected !!